Bicycles are known to have a more straightforward structure than motor vehicles (ex: cars, trucks, and motorbikes). Nevertheless, numerous bicycle models have been introduced to the marketplace for decades, so do not be surprised that each bike compartment also falls into varied categories!
And brakes are one of them; at least four common types of bike brakes have been known to date – and not to mention the supplementary ones!
Our article will gladly clarify readers’ confusion by delving into all these bicycle brakes in great detail. Scroll down for more.
Table of Contents
A. What Is The Most Common Type of Brakes? A Comprehensive List
As briefly mentioned, expect to learn about at least four main brake categories that work well with almost every bike type: disc, rim, coaster, and drum brakes.
On the other hand, rarer brake models are meant to fulfill more specific/niche demands from a smaller demographic.
1. Disc Brakes
Disc brakes should be one of the first contenders on this inclusive list, lauded by many riders as the strongest brake type currently on the market. Despite being rolled out way later than rim brakes, they surged incredibly fast on the popularity chart and received rave reviews for their consistent performance and increased responsiveness in every riding condition.
Even better, the disc’s versatility and braking strength allow them to assist mountain cyclists on extreme races and offroad adventures.
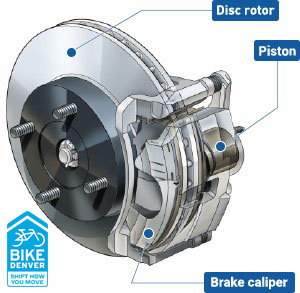
1a. What Are The Main Disc Brake Parts?
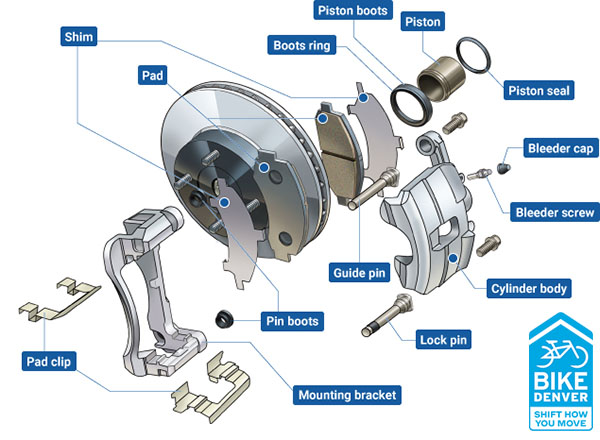
No disc brakes can fulfill their designated tasks without these three elements: rotors, calipers, and pads.
The Motors
Rotors of a disc brake are often installed on the bicycle’s wheel. They come in numerous sizes and dimensions, though the most popular options range from 140 to about 205 mm.
In most cases, bikers often opt for larger rotors – whose heavy load is helpful for mountain cycling and fast-paced, rugged races. They generate better wheel torque, leading to better braking power.
Not to mention, large rotors also pave the way for greater heat dissipation. The brakes will stay cool at all times and stop more smoothly.
The Calipers
The disc’s motors are undoubtedly critical, but any wise cyclist should never underestimate calipers – another essential feature of every disc brake!
Once the lever of your disc brake pushes its braking fluid under force, the calipers will contract by holding the brake pads (which we will introduce shortly after this section). As a result, after tightening, the brake pads will move closer to your braking surfaces, exerting strong pressure on its rotor and slowing down your bicycle’s speed.
The Pads
Here comes the very last puzzle piece to complete it all: the brake pads, often instilled within the caliper. Most of the time, they enjoy grippy, loose surfaces, which help slow down the tire’s rotation by increasing the disc rotors’ friction.
The pads continue to be divided into three different categories:
- Resin (also called “organic”). These pads comprise natural fibers tightened down by resin. Most cyclists concur that they are far less squeaky than other pad types and bed much faster.
- Metal (or sintered). Sintered pads are made from metal to balance durability and versatility in extreme riding conditions.
- Semi-metal. The last one is semi-metal pads, which combine numerous benefits from their organic and sintered counterparts. The required cost undoubtedly goes off the charts – but that’s a good price to pay for, considering the incredible durability and unbeatable braking power.
1b. How Many Types of Disc Brakes Are There?
We have mechanical and hydraulic brakes – whose major difference lies in their mechanism. While mechanical options utilize transverse cable mechanism, hydraulic rim brakes turn to hydraulic brake fluid instead.
This table should sum up other important differences between the two.
| Mechanical Disc Brake | Hydraulic Disc Brake |
| Cheaper to buy | More expensive |
| Easier maintenance | Complex maintenance (especially for beginners) |
| Heavier | Lighter |
| Less responsive | More responsive, suited to every weather condition |
1c. What Kinds of Terrains Are Disc Brakes Suitable For?
As briefly mentioned, discs work wonderfully in various weather conditions, particularly mud, dirt, and rain. While other brake types easily become clogged, disc brakes can avoid such disasters thanks to the narrow contact – and well-covered – padding.
Furthermore, the disc brake’s flexible designs allow them to gain better tire clearance on wider rims. No wonder they shine on mountain and gravel bikes!
2. Rim Brakes
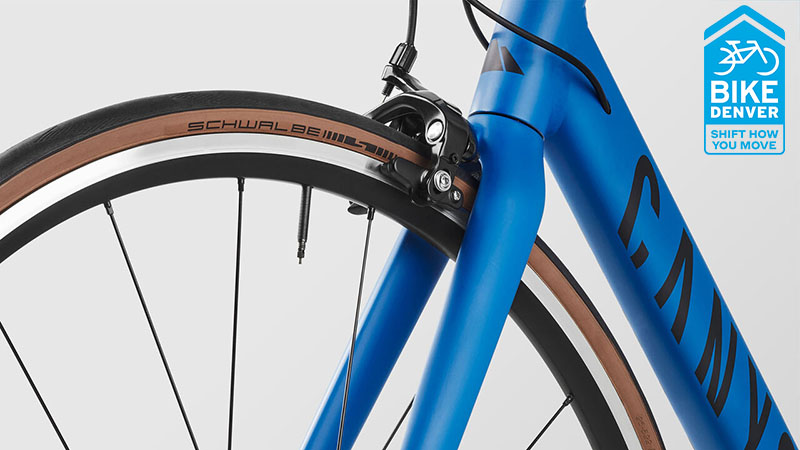
These brakes are much more vintage (older in design) than other brake types. Though they are still commonly used in some cheap hybrid bicycles, there’s no doubt that their popularity has significantly decreased since disc brakes entered the marketplace.
Still, their compactness and light weight are great selling points, which gain them great feedback from many road cyclists who wish to stay aerodynamic throughout their trips.
Rim drag brakes often lie atop the rear wheel hub. After being squeezed, they will add friction to the perimeter and braking surface. Such enhanced friction will reduce the wheels’ turning speed, protecting riders from sudden turns and accidents.
2a. How Many Types of Rim Brake Are There?
Cyclists can choose between three wheel rim brake types, explained further in detail below:
Calipers
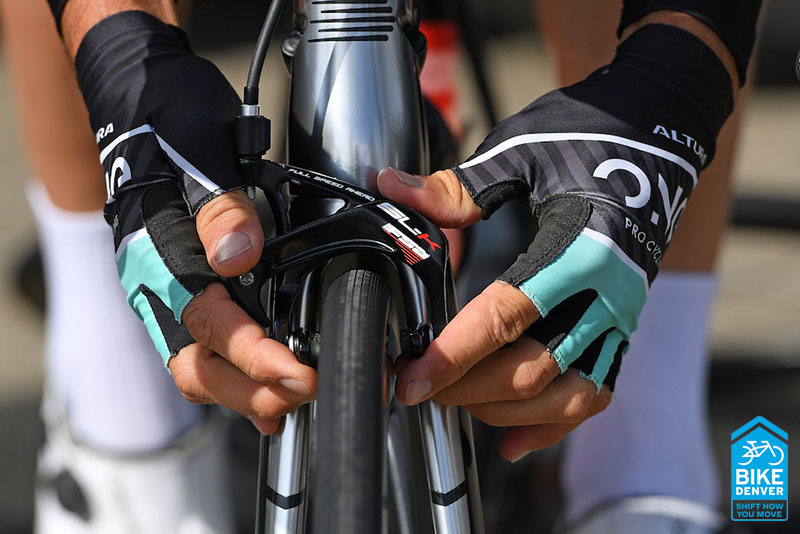
Bike caliper brakes are common among standard bicycle models, particularly during road rigs. (Still, as mentioned, disc brakes have slowly taken over their spot to become the modern standard of advanced mountain/road bikes).
Compared to some brake models, calipers deliver limited stopping power. Still, their aerodynamic design compensates for that shortcoming, which gives off a light and flexible feel.
This sleek yet strong design proves helpful in the bike’s operation. More specifically, the caliper will press down the bicycle’s rim, building sufficient friction to halt it mid-ride. The result is quick, dependable braking that can calm beginners’ anxiety.
(Note: Calipers continue to be broken down into two self-explanatory sub-categories: Standard and direct-pull brakes. Assess which one suits your bike best!)
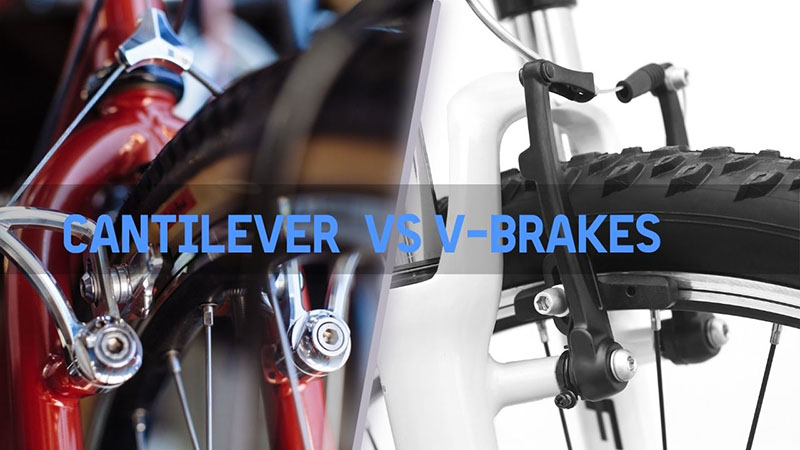
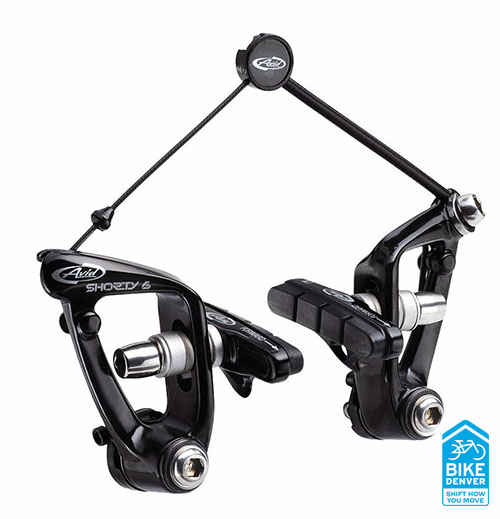
V-Brakes
V-brake options have been widespread among touring, hybrid, and off-road bicycles. Though newer bicycle models have started to turn to disc brakes, V-brakes are still a great alternative due to their good braking power.
Indeed, except for a few exceptions (ex: mucky conditions/weather), V-style brakes are often sufficient in most cases. Even wet roads cannot challenge them if they are equipped and well-maintained enough!
Still, note that V-brake weight far exceeds calipers or cantilevers (introduced shortly next) – some not-so-great news for people who yearn for a lightweight, feathery feel. Plus, the setup might be a bit of a hassle, requiring fork or frame mounts to tighten the compartments.
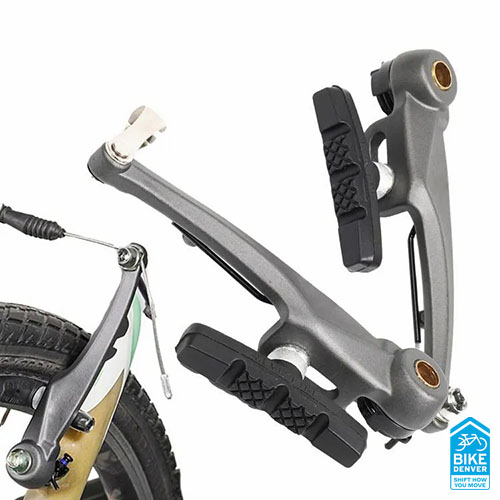
Cantilever
Impressive clearance is one thing that cantilever bicycle brakes pads can do wonderfully well compared to others. Such ample clearance allows every rider to fit wide tires without hassles. Even better, this gap is a great warrior against mud, leaving no room for these sticky liquids to get stuck on the rims. You will enjoy an easier trip under tough conditions!
Aside from being light and clean, traditional cantilever brakes also excel in braking power – except for disc brakes, few other types can touch their levels! Hence, tandem and downhill bikes will be the best bike types for these brakes.
To take full advantage of these cantilevers, ensure their setup is smooth and proper. Always pay attention to their placement, angle, and alignments (particularly the straddle cables). And in the cases of high-quality, more premium bicycles, you should probably purchase special forks for better mounting.
Like their V-brake peers, cantilevers also adopt cartridge-shaped pads. Those who hate bothersome wheel removal and replacement can breathe in relief; these pads are easy to extract, meaning you can pull them off to install new ones anytime you like.
2b. What Kinds of Terrains Are Cantilevers Suitable For?
Unfortunately, rim brakes tend to give a lackluster performance in wet conditions due to possible water buildups on their rims. Riders can get used to that over time, but the process might pose numerous challenges regardless.
Hence, we strongly suggest using rim brakes for casual rides. They are not as performance-oriented as disc brakes and are easy to maintain and change. From an economic standpoint, cantilevers also come at a much more affordable price, which is great for tight-budget customers.
3. Coaster Brakes

Without the hassles of extra cables or levers, coaster brake options are perfect for standard bike frames and first-timers.
3a. How Does It Work?
Explained in simple terms, it refers to a brake type in which the pads press against braking surfaces (within the bike’s rear hub) in an outward position.
Its clutch slides along the axle whenever you pedal the bicycle forward. But once the pedals have been forced backwards, your clutch will engage immediately, pushing the coasters onto the surface.
3b. Setup and Maintenance
Coasters are designed to work with internal-gear hubs, meaning all external elements can barely touch their edges. Hence, no excessive maintenance is needed.
They do not demand cable installation, either, aiming to deliver cleaner finishes to your bicycle. You will find shifting between gears much easier: all there is to do is to push the pedal in anti-clockwise directions.
3c. What Kind of Terrains Are Coasters Suitable For?
It’s easy to spot a coaster brake in kids’ cycles, cyclocross bikes, and city bikes. Experts recommend using them for leisure rides around urban areas on smooth, mostly paved surfaces. Otherwise, more extreme/longer rides are not advised!
4. Drum Brakes
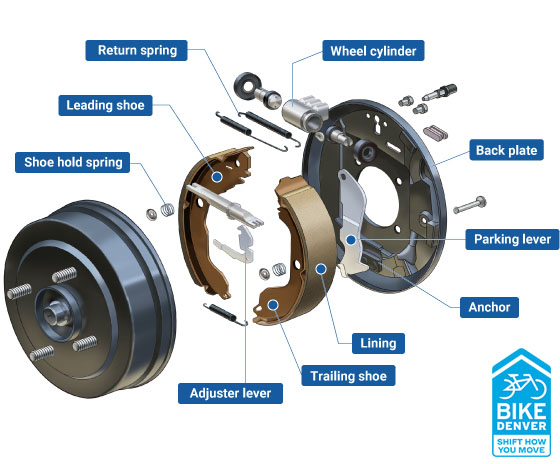
Drums are brake systems with rotors that rotate around the wheel sizes. Inside every motor is a brake shoe that aligns strictly with the friction material (the brake linings).
The pressure mechanism (the positions) will press the motors from within to exert braking force, allowing you to reduce your speed and stop the bike entirely.
4a. How Exactly Does It Work?
The above intro should give you a broad overview of the drums’ mechanism; here are some smaller details to complete the big picture.
More specifically, once you press your feet on the pedal, your brake boosters (or servo systems) amplify that power twofold, using the master cylinders to change that energy into oil pressure/hydraulic pressure.
This pressure surge will traverse across the head tubes (filled to the brim with brake fluid/oil) to reach the wheel’s brakes. Your bike’s pistons are pushed on all four wheels to press against the friction linings inside the rotors that rotate along with the tires.
These linings touch the rotating rotors, keeping them from maintaining their current speed/accelerating. As a result, your gear bike will decelerate and reach its complete stop.
4b. What Kinds of Terrains Are Drums Suitable For?
Introduced in 1902, these drums were a sensational hit for decades. Hybrid Bikes (and even automobiles) installed this roller brake for medium-length trips and tours.
Nevertheless, it’s hard to find them on modern bike models, slowly replaced by rim and disc brakes. You can still use them for short leisure activities, such as riding with your kids on a grass field during picnic trips.
5. Other Uncommon Band Brake Types
All the braking types introduced above are popular. Nevertheless, do not neglect some other, rarer types that you can still come across some days.
- Spoon Brake. As its name implies, this rear brake has a spoon shape. The metal will press on your front tire directly to reduce its speed. Its braking force should always stay minimum; otherwise, your tire treads might suffer from damage.
- Rod Brake Actuated. The system incorporates rods stemming from hand levers. They pull up two pads before putting more pressure on your rims’ insides.
- Duck brake. Like with spoons, you can already guess how it is shaped. The mechanism involves two rollers (made of rubber) directly pushed onto the tires.
B. Signs of Unsafe Brakes or Hub Brake Failures

The following indicators are pretty recognizable. Hence, do not forget to double-check your bike frequently to give them immediate fixes.
1. Squeaking and Squealing Noises
Sometimes, unusual noises stemming from the brakes do not necessarily mean indicators of trouble. It might be just some foreign objects stuck within the brakes (debris or pebbles, for instance).
Another possible cause is that some metal pads within the brakes directly contact the rotors, which produce high-pitched sounds whenever the braking system is applied. The message is clear: it’s time to replace the brake pads!
3. Grinding Noises
We have just debunked squeaking/squealing sounds. How about grinding noises?
Whether your brakes are drum or disc, grinding noises mean it’s time to service your bike right away – as its shoe/brake pad is scraping hard on every metal contact point.
Any case of grinding requires instant treatments. A quick visit to trustable shops is highly recommended!
4. Vibration or Wobbling When Braking
Is the bicycle shaking/vibrating whenever you squeeze the brakes? Chances are that the rotor’s density is uneven.
As previously introduced, rotors are huge discs sitting within the wheels. Whenever you squeeze them, the pads will push themselves against these rotors, stopping the bikes from spinning.
Such a constant mechanism means natural wear down is inevitable, leading to uneven/slippery surfaces. The braking friction after brake applications will transfer the pad materials straight to the rotors, and since these transfers are unstable, your braking will experience intense vibration!
From here, pad materials will build upon these uneven spots and worsen the situation over time.
Once again, have the bike checked and serviced by professional mechanics!
During the servicing, technicians will smooth/even out the rotor face to correct their transmission, stopping the bike from wobbles. But if the damage/wear-down is beyond save, they will get replaced instead.
5. Leaking Fluid
When riders apply their brakes, a vast majority of compartments spring into action simultaneously. One such compartment is the brake hydraulic fluid, which produces hydraulic pressure on the brake calipers. Without brake fluid, there’s no way to stop the bicycle (especially a majority of road bikes) safely!
Stoop down to check the brake fluid carefully. If you are uncertain about the entire process, have mechanics/technicians do so for you.
6. Soft or Spongy Brakes
Brake pressure often results in certain levels of resistance against your feet.
So if these brakes feel abnormally soft – or their pedals sink completely down, there’s a chance that your braking system suffers from excessive moisture or air. Malfunctioning master cylinders are another common reason.
7. The Bike Pulled To The Side
This issue might result from numerous bike issues, but caliper/bad brake problems should still be among your first considerations.
When it happens, one brake might still be functioning while the other refuses to work, causing the side’s direction pull that creates braking force.
If there’s only one malfunctioning rear caliper (instead of both), cyclocross riders tend to overlook the problem. Hence, never forget to have your bike regularly inspected by repair shops before the situation goes beyond control.
8. Terrible Smells
Chemical sharp odors could also be a signal of overworking brakes. To prevent brake failure, pull your bike aside and let its braking system rest for a bit.
Do you also spot a burning smell whenever applying the brake, especially going downhill or coming to a sudden stop at high speed? Your brake caliper may have broken down while locked in its position and enduring lots of friction. Again, fix it immediately before proceeding with your trip. Otherwise, accidents might occur!
C. How to Maintain The Brake’s Conditions?
1. Rim Brakes
Step 1. Clean the rims and pads using alcohol-based products
Use scrub files or pads to remove glazed-on gunks on the pads. Check whether they are beyond saving: should you find it impossible to scratch them off with fingernails, new pad replacements are required!
Step 2. Check the pad thickness
Do not forget to look at the pad density. Most pads incorporate indicator lines for wear and tear, but if yours don’t, using grooves instead is fine.
Does the groove/indicator line disappear completely? Time to replace the pads!
Step 3. Toe-in your pads
You should toe in the brake pads if they keep producing squeaky noises.
Angle the pads so that the front and the rim contact immediately. Then loosen the bolts on the brake arms, position these pads and tighten them lightly.
Confirm that the pad will not slip off its position (trust us; that’s quite common!) before finishing with the tightening. After that, check its post mount on the rim, which is a straightforward process but can be a bit time-consuming. But be patient!
Note: Do not overdo your toe-in. Pad rears should have some clearance against the front tips. And counting the linear brakes, this difference should not exceed one millimeter.
If there’s still squealing, it’s alright to toe in a bit more. Yet, anything more than 2 millimeters is a big no.
2. Coaster Brakes
Step 1. Settle the bicycle
Pull the back wheels out by detaching its metal band with screwdrivers. They will help extract the bolts from the reaction arm.
Step 2. Free the bike axle nuts
Do you see those axle nuts tightly locked on both of the wheel’s sides? Free them. Always remember where you keep these nuts; a wide variety of riders often misplace their axle bike nuts after Step 2 and fail to find them later.
Step 3. Release the sprocket chain
Once done, pull the chains off the sprocket. You should also remove the wheels.
Step 4. Tighten the brakes
Now tighten your coasters using cone wrenches. Finally, reinstall the wheels.
3. Mechanical Disc Brakes
Rotors play a critical role in every disc brake, so maintaining them properly is necessary.
Step 1. Double-check their placements
First, ensure there’s nothing wrong with their setup. A rotor that needs tweaking will rub against the pads and make unmistakable noises. Also, overheated rotors will result in slight warping, even throwing the rotors out of balance.
Is everything alright here? Good. But if your rotors require some adjustments, time to move on to the next steps.
Step 2. Adjust them
Adjustable wrenches are our favorite tools, but rotor-truing equipment is also a great idea, providing enough leverage without the rotor’s damage or scratch. (Not to mention, they are cheap and easy to use!)
Spin the wheels and note the placements of rotor rubs and brake pads (Where are they? Which side are they on?). Next, bend lightly to help the rotor sit straight.
Step 3. Clean them often
That’s everything you need to troubleshoot squeaky noises. Otherwise, the maintenance process is straightforward: always keep the rotors clean to guarantee strong and quiet braking. Whenever there’s grime and dirt on the rotor’s surface, remove them with isopropyl alcohols.
There’s no need to do that after each ride, but it’s still a highly-recommended task to consider on your checklist whenever you clean other parts of the bikes.
4. Hydraulic Disc Brakes
Step 1. Get the bike ready
You should place the bike on a jack stand to keep it correctly inclined and stable (how the alignment turns out will depend on the rear braking circuits for each bike model). Only then can the circuit tubes stay vertical and facilitate air bubble ejection.
Step 2. Loosen the road lever and caliper
The next step is to loosen the lever, moving it – and the oil tank it’s connected to if any – to horizontal placements.
Next, pull off the calipers and disconnect them from the bike’s fame. Then remove the pads and the clamp “bleed-block” (a spacer made of plastic to keep the piston well-locked and pressed outwards)
Continue to remove the purge nipples on calipers and lever blocks. Some WD40 products are recommended to smooth out the process if you meet any resistance.
Step 3. Inject the oil
Inject the oil in the caliper bleed and wait until it’s properly filled. Clean the excess oil, reinstall the moved compartments, and you are ready to go!
5. Drum Brakes
Step 1. Adjust their free play
Use an adjuster to adjust its free plays (which will increase further with wear and tears once the cables stretch and shoe linings break down) to the correct specifications.
If you fail to meet those specifications, your brake cables might stretch beyond the required limits, destroying the shoes.
Step 2. Perform further adjustments
Certain bike models have cable tweaks near the lever ends. If that’s your case, turn the adjusters and loosen the lock nuts as needed. Strengthen them when finished!
Take ATV bikes, for example, whose cable and lever assembly on front wheels are quite distinctive. Its brake lever operates on both front brakes via the equalizer to ensure even application. Thus, your job is to balance the right and left free play and confirm they are similarly engaged.
Step 3. Apply the brakes properly
When braking the bike, always do so fully to put the indicators in their specified zones. Should the shoes exceed wear-out markings on the panels, replace them.
D. How to Adjust The Bike Brakes?
If you have been patient enough to read this far, you will realize two main components make up the braking mechanism, regardless of which brake type you choose: the pads and the cables.
Either loosen or tighten them accordingly until they are a snug fit. Use lubricants if necessary!
For brake pads:
1. Inspect whether they have been eaten up past the “wear line” (a groove on the pad’s side). If yes, it’s time for new parts.
2. Apply the brake and check if the brake pads touch the rim in the center. Use a wrench to loosen the pads and move down or up when the contact point is too high or too low, respectively.
For brake cables:
1 Squeeze the brake levers to check the distance between each one to the handlebar’s grip. If the result exceeds 1.5 inches, it hints at loose cables.
2. On each side of the brake lever, turn the barrel adjuster anti-clockwise to loosen it.
3. Unbolt the screw that secures the cable. If you can’t locate it, keep tracking the cable until its end, and you will see the bolt. To tighten the cable, pull it outward. Finally, screw the bolt and tighten the barrel adjuster back.
View more: Part of A Bike Components Diagram
Conclusion
Our insightful article has explored in depth all types of bicycle brakes available; even uncommon options are introduced to ensure you can get your hands on diverse options suited to your preferences and budgets.
Still, remember that these compartments work harder than most other features to sustain a smooth performance for the bike. Hence, no wonder they tend to wear out and deteriorate faster than expected!
Always keep a close eye on all the unusual signals (if any), and bring your bike to a close, trustable repair shop for instant treatments.