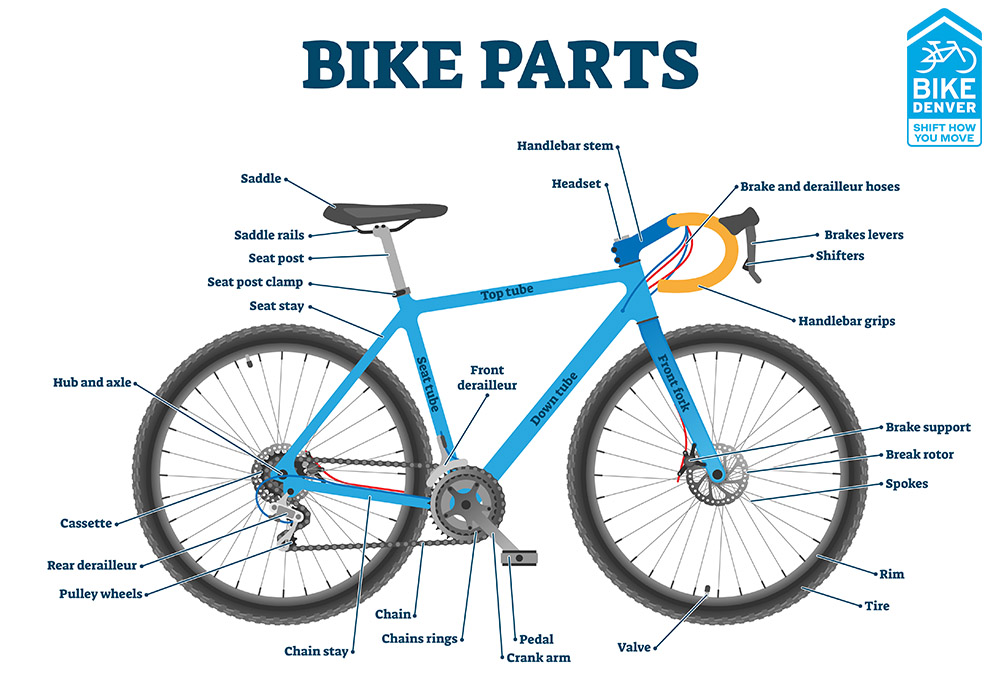
Bicycles are among the most (seemingly) simple vehicles that even a child can master. But have you ever considered that behind its smooth operation is an entire compartment system whose parts work well with each other?
Learning what they are and how they often work will lend you critical insights into how to improve a bike’s performance!
Our expert team has stepped in to lend a helping hand and give you a detailed discussion on different parts of the road bike diagram. Keep scrolling to learn more about average bike anatomy.
Table of Contents
What Are The Main Bike Parts?
There are six major areas you should pay attention to, each of which continues to be divided into smaller segments:
- The main parts
- The complex front parts
- Wheel components
- Brakes
- Setup and Seat
- Drivetrain
The following section will analyze this list of bicycle parts in more detail.
1. Main Parts
Like anything, bicycles are also divided into main and secondary components. The former (main features) point to a bike’s most essential parts; no bicycle can operate without installing them. Here comes a further breakdown of what they comprise:
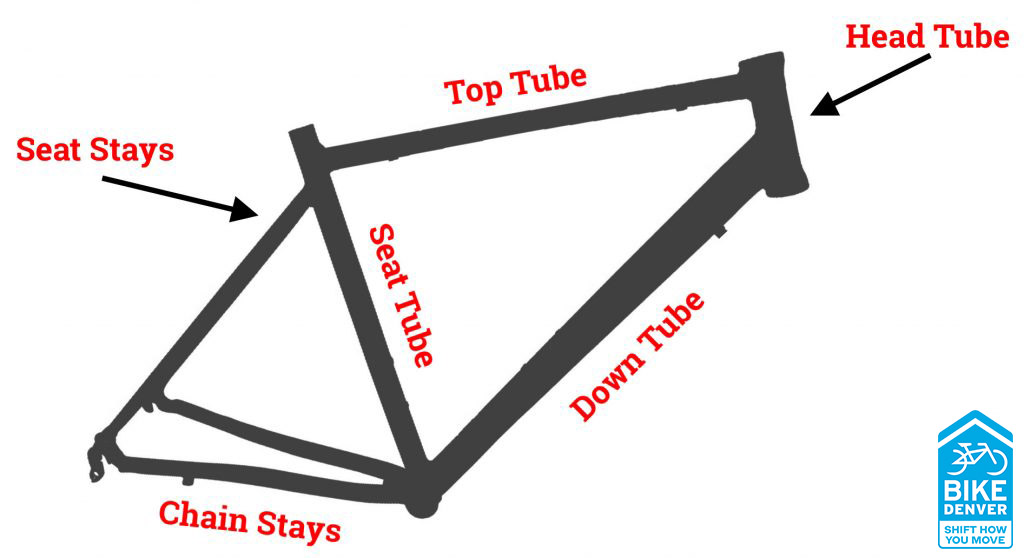
1.a. Head Tubes
A bicycle’s head tube is set up atop the bicycle, settling comfortably in the forefront of most bike frames. These cylindrical tubes stabilize your fork steerer, while the ball bearings (placed within these vertical tubes) enable the steering wheels to make turns and pivot freely.
In most cases, rear brakes run along the top tubes. But in the cases of higher-end bikes, these brakes can also run parallel inside the tubes.
1.b. Top Tubes
Another critical part – the top tubes – connect the head tubes and rear tubes at the bike’s front. Running along with the grounds, they are installed to allow you to choose whatever riding styles you desire.
The longer these tubes are, the more aerodynamics your bicycle will enjoy, fostering more aggressive riding. Meanwhile, shorter ones are great for climbing. While we cannot deny some aerodynamics are sacrificed, you will seize more stable control over your bicycle and experience a more comfortable ride when traveling uphill.
1.c. Down Tubes
Take a closer look, and you will realize almost every bicycle has down tubes – which also run along with the ground but from particular angles. They connect the bike’s lower-side components to the top ones, adding stability to guarantee your bike will not wobble during the trip.
The included rear derailleur cables will flow through the bar, climbing to the handlebars and the bike’s top. Still, some bike models (especially more modern ones) build these cables within the down tubes for better protection.
1.d. Seat Tubes
Of course, we cannot skim over seat tubes at your bike’s rear. They travel from down to top tubes, connecting them to offer you better balance and control. Your seat slides into these seat tubes as a result, meaning it’s in the right position and hence, more comfortable.
Remember that the seat’s angles make huge differences in your overall experience. The more angles it has, the better your aggressive pedaling and aerodynamics will be – though some amount of bike control needs to be sacrificed during the process.
For beginners, we strongly recommend slack seat tubes, whose flexible structures deliver both convenience and solidity.
1. e. Seat Stays
Let’s explore the next segment – seat stays, which run down all sides of your bicycle frame and give it better rigidity.
Most seat stays often deliver mounting points to the actual brakes. But in more expensive bikes, these stays also do the same thing to other bike features.
1. f. Chain Stays
Considered another solid component attached to the bike rear, a chainstay links tightly with the seat stay and plays a huge role in the bike chain’s location and setup.
Since the chains run above and below chainstays, most seasoned riders often set up protective covers and layers on the chainstay to safeguard their chains. That way, every potential damage is successfully prevented, and the bike’s performance also experiences an impressive boost.
1. g. Forks
Unbeknownst to some, forks are an irreplaceable part of most average bicycles. So what is the diagram of the bicycle fork parts?
The forks are parallel to your front wheels, with two side parts going down and connecting the front tire. They also hold the bike’s suspension by coming together on top of the fork crown – above where the suspension is.
Fork types differ across bike models, but regardless of their categories, you will enjoy much easier steering thanks to their installation. So whenever the bicycle encounters steering problems, they should always be among the first things you must inspect.
Extra mounting points added to them will only elevate the bike’s efficiency to a new level.
2. Front Parts
Most features set up at the bike’s front are crucial in its control and handling. You can compare them to cockpits – where all the cumulative speed and navigation elements are located.
2.a. Bike Headsets
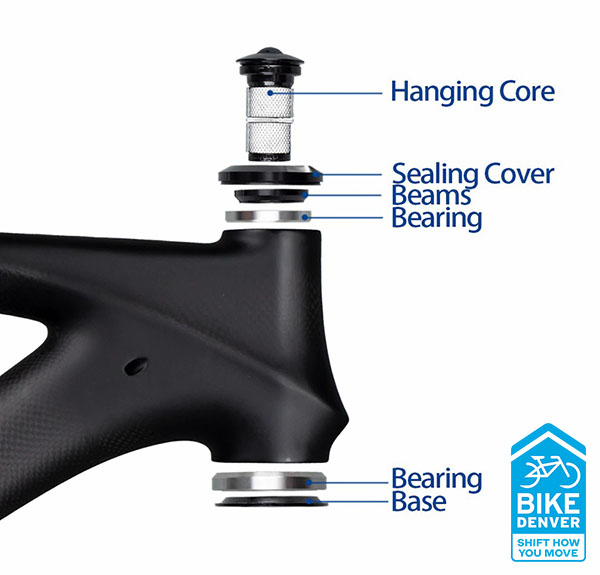
Bicycle headsets are rotatable components that sit tightly on the fork steerer (below and above the head tube).
Two cups comprise their structure, each of which houses several bearings to enable smooth turns for the straight handlebars. And top caps are another key headset segment, which preloads the headsets before setting their stems on the spot.
Many different headset types are available, but the most popular are threaded and integrated-system headsets.
2.b. Stems
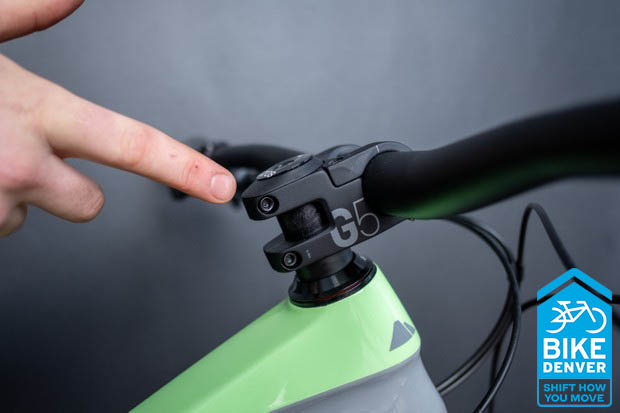
After learning about the headsets, we naturally enter the stem, which attaches the front fork’s steerer tubes to the handlebars. Due to this straightforward design, the fork will rotate whenever you turn the handlebars, changing the travel’s direction easily.
Older stems (also called “quill stems” will expand whenever they become tightened within the steerer tubes. Meanwhile, modern ones – often front-loaded – include numerous screws that let you remove the handlebars without involving the rear gear shifters, brakes, and bar tapes.
2.c. Headset Caps
Also known as stem caps or top caps, these headset caps help the bike exert more pressure on the headset. They sit atop your steerer tube and must continuously get tightened until no movement or play is detected inside the headset.
Once you tighten the caps correctly, the stem will adjust accordingly to boost the bike’s balance and flexibility.
2.d. Handlebars
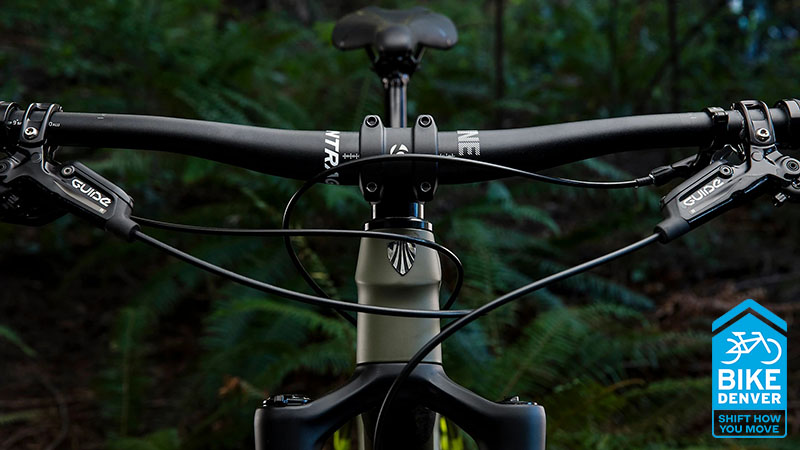
Here comes a more familiar feature to almost everyone: the handlebars. A rider often holds onto these bears while cycling and steering.
The bike’s handlebars are connected closely to the stems to be secure in place. More recent bike models step up the game by using completely-integrated handlebars – fusing the stems and handlebars into one sole box.
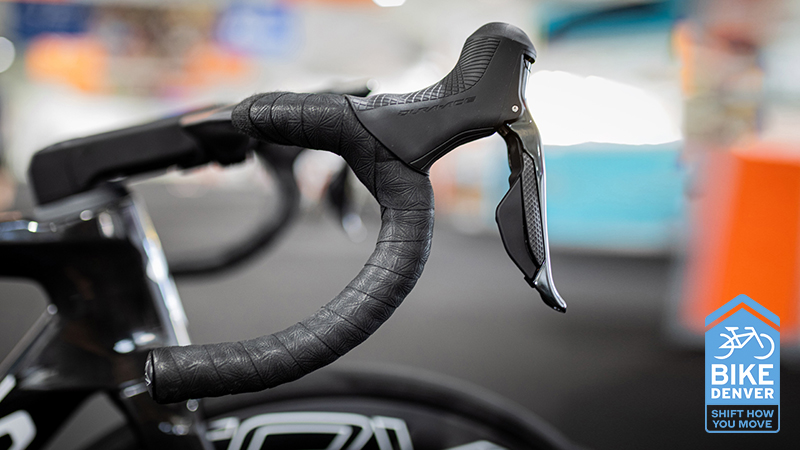
2.e. Brake Levers
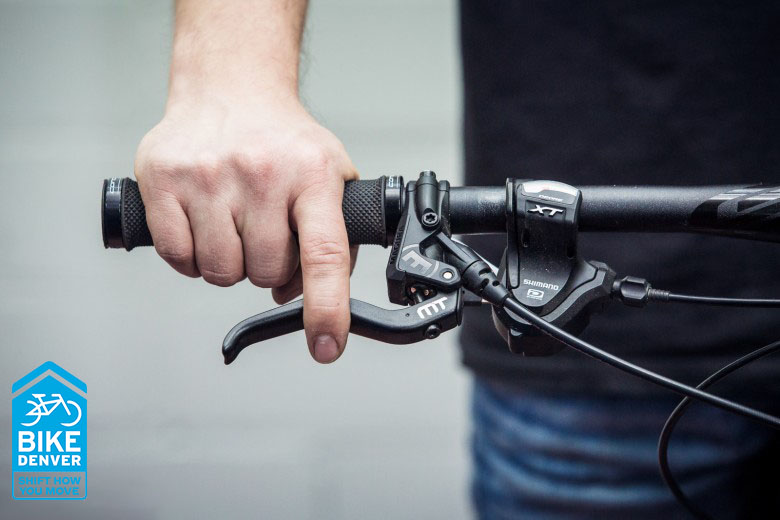
Right on the handlebar lies the foundation for brake levers. How exactly do they work?
A tiny cable (aka the brake cable) is connected to every lever’s inside. When you squeeze the levers, it will pull the cable tight, causing brake calipers to tweak the disc rotor or wheel rim. As a result, your bike will be slowed down and kept from moving forwards.
Nevertheless, numerous bicycles use STIs (Shimano Total Integrations, also called shifters) instead. They work like standard levers but with added capabilities: gear-changing and brake-gear separation.
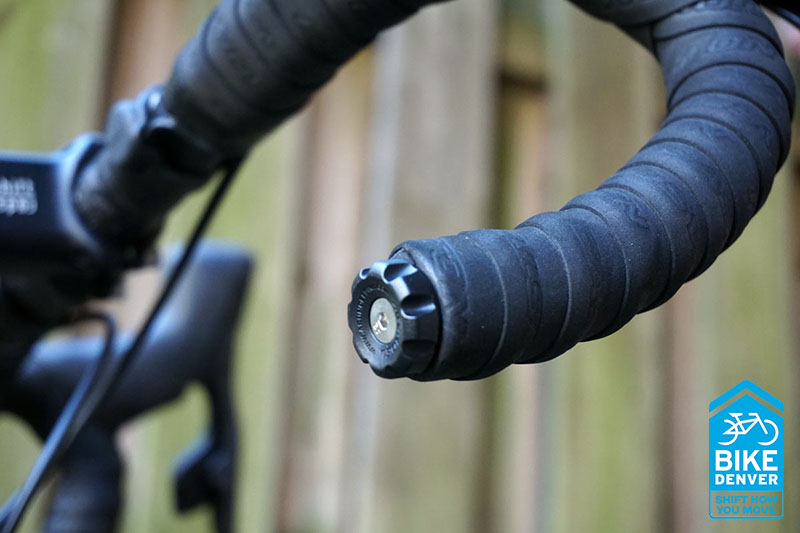
2.f. Bar Tape and Grips
Regarding bike control, bar tapes or grips are indispensable. You will find most typical grips on hybrids, BMXs, mountain bikes, and other bike types. On the other hand, bar tapes are more popular in road-orientated bikes and traditional road bicycles.
A typical grip comes with textured rubber, allowing riders to hold the handlebars securely without too much squeeze pressure. They also increase steering control and dampen vibrations. Bar tapes are basically similar in this regard, offering handlebar controls, cushioning, and grip increases.
For longer bike rides, experts suggest using more cushioned, thicker bar tapes and grips. They comfort your numbing fingers during cycling and sustain your bike control.
2. g. Bar-Ending Plugs
How about bar-ended (or handlebar) plugs? These small plugs slot within the handlebars’ ends, installed to keep you from serious injuries once crashes or falls occur.
Open-ended handlebars, otherwise, can puncture your delicate skin with their sharp edges! According to the National Library of Medicine, many people, especially children, have undergone fatal accidents after those open-ended bars pierced straight through their abdomens and destroyed vital organs. Be careful!
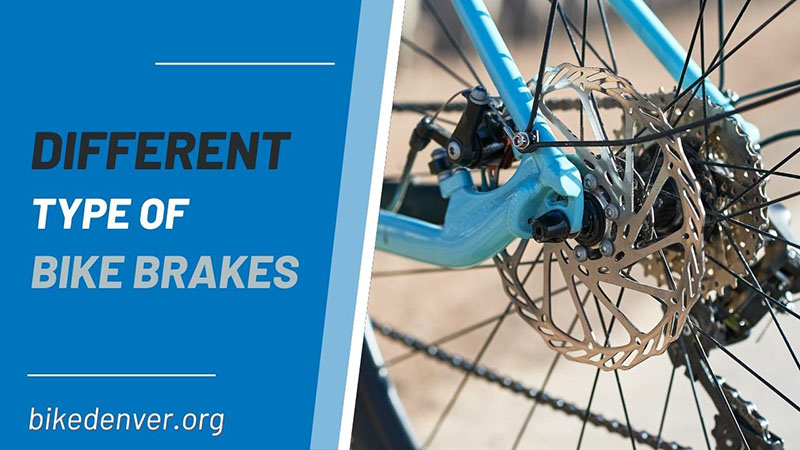
2. h. Brakes
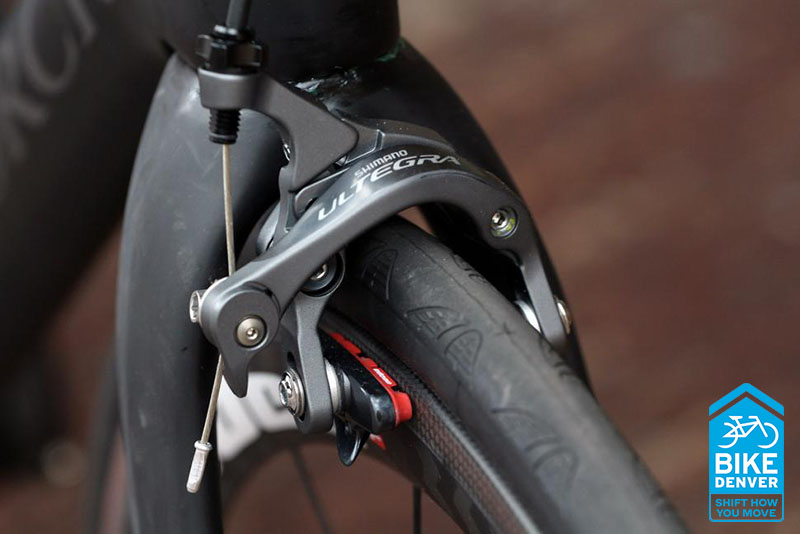
With brake installation, you can reduce your traveling speed thanks to adequate friction on the braking’s flat surface.
The following is a brief sum-up of the brake types, though hub brakes are more likely something of the past. You can find other kinds of brakes mentioned on the list these days.
Plus, riders engage both disc and rim brakes by squeezing the brake lever. Meanwhile, hub brakes only operate when using your feet:
- Hub brakes. Back then, they enjoyed great popularity among commuters, comfort, and city bikes. When using hub-brake bikes, people would pedal backward, pushing the hub brake to engage with the rear hub and slow their speed.
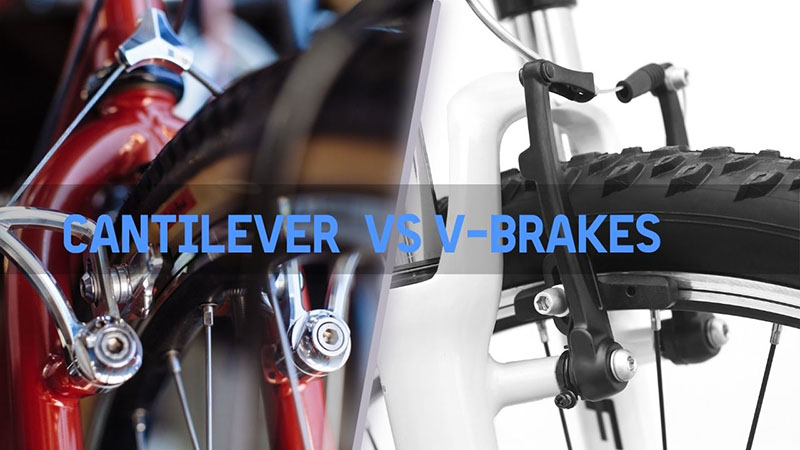
- Rim brakes. There are three smaller categories for rim brakes: V, cantilever, and caliper. They halt the bicycle by using brake pads to pinch the braking surface on the rim.
Despite their ongoing popularity, some deem them not as efficient as their disc counterparts, especially in very wet conditions or at extremely high speeds.
- Disc brakes. A disc brake does not use rims that have braking surfaces. Rather, they employ calipers to clamp the disc brake motor connected to the wheels’ exterior. And as we just mentioned, they work wonderfully in wet weather conditions and are commonly purchased by mountain bike owners. The majority of road bikes are equipped with this brake.
- Mechanical brakes: found in most lower-end, cheaper bikes. There’s a wire running through the brake systems, pulled taught for better brake engagement.
- Hydraulic brakes: much more expensive than the rest – but in return, the braking control is top-notched. They use brake hoses filled to the brim with fluid. When the levers are squeezed, the liquid will go under pressure, causing your caliper to press down the disc rotors. You can easily find this brake type on mountain bikes.
2. i. Brake Cable
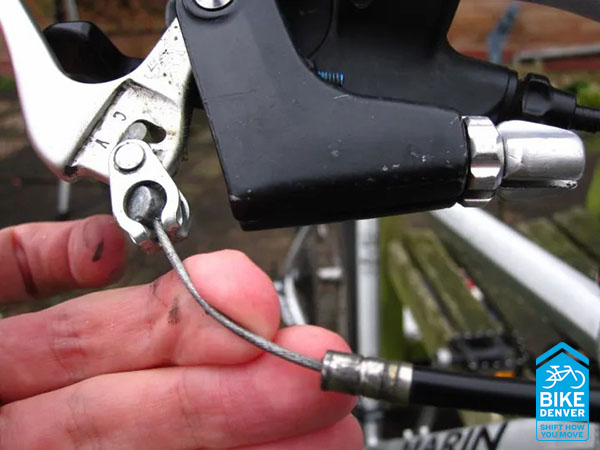
Lastly, we have the cables to join our bike brake parts diagram, which control velocity and the mechanical brake system. These cables incorporate an external housing for better protection, allowing them to move inside much more freely.
Their typical lengths range from around 1.5 to 1.6 millimeters (in diameter). Different head types are available at large stores for riders to browse through; choose the right one to suit your cycling disciplines and preferences.
3. Bike Wheel Components
Sure; how can a bicycle (or any vehicle ever) run on the streets without wheels? But remember, wheels are not just… well, wheels; they feature numerous different parts. Let’s explore their anatomy and the bike rear wheel assembly diagram:
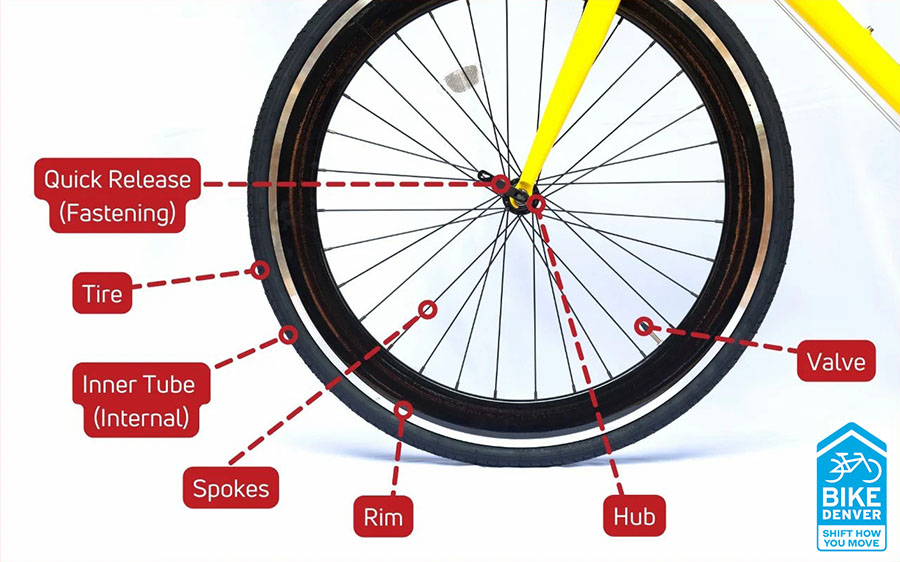
3.a. Hubs
With no hubs, your wheels will never stay kept together. They comprise bearings that allow free turns for the wheels when necessary, and replacements are also a piece of cake.
Also, the other five components should be taken into consideration as well, whose major role is to ensure a perfect wheel setup for the bike:
- Hub Shells: The shells house every wheel component and are made from long-lasting aluminum materials. Here are where the spokes (introduced later) gather together and connect.
- Axles: Axles run across the entire shell to secure the frame with the wheel. There are numerous types: some are fixed, while others are quick-release.
- Ball Bearings: The name is self-explanatory, allowing the wheel to roll more freely. They also guarantee whether the wheels obey your command or not.
- Cones: How to tighten or loosen ball bearings? You have the cones for this task. Often placed close to the hubs, cones give you better access to all the bearings.
Nevertheless, most average riders or non-technicians do not concern themselves with cones; they are more of a field for professionals.
- Lock Nuts: The last part of this big scheme – lock nuts – tightens every component together. Yet, over-tightening them is never advised; only exert the right amount of force if you do not want to encounter technical issues.
3.b. Rims
Their importance is no less than other bike compartments. The materials involved are numerous, though the most common choice for modern bikes is long-lasting aluminum substances – with spokes screwed directly into them. That way, they make it easier for the rims to accommodate different tire types.
Rim thickness can make huge differences in how the bike performs. For once, thinner rims enjoy more aerodynamic drags, meaning propelling yourself forward is much more seamless.
But when it comes to durability, thicker rims have the upper hand on hard terrains – the main reason most mountain bikers employ them.
3.c. Spokes
The article has mentioned spokes several times when introducing other bike parts – but what exactly are they?
Taking charge of holding the rims and wheels intact, these spokes are among the few bike compartments you can tweak and adjust on your own. (Still, for inexperienced bikers, we suggest getting professional help!)
Tightening or loosening the spokes are common changes riders often apply to these devices. Remember that they also bear your body’s overall weight, so tread cautiously; otherwise, the damage is inevitable!
Too-tight spokes will snap instantly if the weight put on them is way too much, causing additional tear and wear to the tire’s frames and outer rims. Meanwhile, too-loose ones could bend due to the lack of tension for pressure support. Your bike will sink as a result.
3.d. Spoke Nipples
As the name implies, these nipples hold the spokes together and help them slot more firmly into their holes. These small items are threaded across the tire’s rim to sustain and tackle every spoke riders put on it.
Nevertheless, do not forget that nipples do not work with every spoke type; ensure a correct setup for your bike.
3.e. Tires
Among other bike compartments, tires are the only ones that actually touch the ground, enabling you to travel through different terrains.
Varied bike types use varied tire types, with mountain bicycles having more threaded, denser tires and road bicycles enjoying smoother, thinner tires.
Three options are available for you to consider:
- Tubeless. Tubeless tires are quite popular these days due to their puncture resistance. Rather than depending on internal air circulation, they incorporate sturdy sealants to avoid inflation issues. The only major downside is the price.
- Tubular. These tubular tire options will be perfect for most road bicycles, glued tightly to their rims. Since no rim sidewalls are involved, they suffer from no limitations and absorb pressure excellently.
- Clincher. Tight-budget customers should also consider standard clincher tires that often sit between the rims’ beads. They might suffer under too much pressure. But in general, clinchers are still great choices for light riders and beginners.
3.f. Valves
Do you see the small segment within the frame and the tires? That’s called a tire valve, which is responsible for the tire’s deflation and inflation.
Schrader and Presta are by far the most popular type of bike valves. The latter boasts thinner inlet that suits road bikes best, while Schrader thrives in other commercial bikes currently available on the marketplace.
See more: The 3 Different Bike Tire Valve Types
4. Drivetrain and Seat Setup

4.a. Drivetrain
Drivetrains – among the underrated features in a bike – work mostly with the gears to foster consistent moving speeds. They involve the following segments:
- Bike Crankset or Chainset. What is the bicycle crankset parts diagram? It comprises bottom brackets, chainring assemblies, and crank arms. Together, they transfer your legs’ rotation to the bicycle’s rear wheel (via bicycle chain accessories).
- Pedals. Pedals act as a standing/pushing platform for you during cycling. The back wheel will receive more power from the foot as a result.
- Front Derailleur. When you tackle flat roads or big hills, front derailleurs let you shift on the chainrings to reduce or increase the pedaling pressure.
- Rear Derailleur. This derailleur transfers chains between the cassette’s sprockets (we will introduce the cassette’s bike sprocket diagram later) on your rear wheels. The bike will have much more slack, maintaining better chain tension when moving across the rear cogs.
- Jockey Wheel. A bike’s rear derailleur consists of two jockey wheel types. The lower ones maintain and manage the gear-shifting chain tension. Meanwhile, your upper jockey wheel (guide pulley) shifts the gears and leads your chains across the cassette’s sprockets.
- Cassette and Sprockets. Cassettes are an irreplaceable part of a drivetrain, containing different cogs/sprockets on the rear wheels’ freehubs. Modern bikes use sprockets of 8-11, while other cassettes work better with sprockets of 5-13.
4.b. Seat Setup
Let’s wrap up our long guide with a summary of how the bike seats are comprised of:
- Bicycle Saddle Rails and Seats: They are where you will sit when riding a bicycle. These devices decide whether your experience is comfortable or bumpy and tiring; double-check their qualities carefully.
- Saddle Posts: The saddle clamps/posts enable riders to freely change the seat’s ride heights. The more flexible they are, the more balance and leverage you will benefit from.
- Seat Post Clamps: Without them, your seat will keep sliding off its position. Weak and substandard clamps will not do; we strongly recommend finding the most premium clamps for your seat posts.
What Is The Most Important Part of A Bike Components Diagram?
It’s hard to give the title to only one compartment, so we let five of them share the honor: the chains, brake pads, bike pedals, tires, and cables.
Constantly check for wear and tear and rust on these compartments, and ensure there’s just the right amount of pressure on them (neither too loose nor too tight).
How Do Bikes Manage Balance?
There’s no single reason behind this phenomenon, and finding a concise explanation is difficult. Nevertheless, as per experts from Nottingham University in 2007, this trio all contribute to its spectacular balance:
- Gyroscopic precession (see more explanation here)
- Lateral floor-reaction forces or how your body mass is distributed (often found in the front wheels’ contact points)
- Inertial reactions and gravity (due to the centers-of-mass region on the steering axis).
FAQs
1. What Are Quick Tips to Increase Acceleration?
You can remove excess weight, switch the exhaust, or increase the air intake.
2. What Are The First Upgrades I Should Apply on The Bikes?
Bicycle wheels, chainrings, brakes, bars, and tires are the first components you should upgrade.
Conclusion
This guideline has explored, described, and explained the complete diagram of mountain bike parts, breaking down this vehicle into several major areas to make it easier for confused novices.
We hope you have understood the tight connection between these features – and how to boost their performance through appropriate and right-timing upgrades!
In most cases, bicycles are the first steps to getting closer to mastering a full-fledged motorcycle – after all, they both require a spectacular ability to maintain control and balance. So while waiting for that day to come, keep practicing on your precious bike!